


As we will end up in a chicken -or- egg situation if we use Terraform to build a backend to store its state, we will have to configure this bit without using Terraform.
Therefore, let’s use the az command to configure the storage account in a different resource group that Terraform will not manage.
Creating Azure Storage resources
Let’s start by defining a few variables:
$ RESOURCE_GROUP=tfstate
$ STORAGE_ACCOUNT_NAME=tfstate$RANDOM
$ CONTAINER_NAME=tfstate
Create a resource group first using the following command:
$ az group create –name $RESOURCE_GROUP –location westeurope
Now, let’s go ahead and create a storage account within the resource group using the following command:
$ az storage account create –resource-group $RESOURCE_GROUP \ –name $STORAGE_ACCOUNT_NAME –sku Standard_LRS \ –encryption-services BLOB
The next step is to fetch the account key using the following command:
$ ACCOUNT_KEY=$(az storage account keys list \
–resource-group tfstate –account-name $STORAGE_ACCOUNT_NAME \ –query ‘[0].value’ -o tsv)
Now, we can go ahead and create a Blob Storage container using the following command:
$ az storage container create –name $CONTAINER_NAME \
–account-name $STORAGE_ACCOUNT_NAME –account-key $ACCOUNT_KEY
If we receive a created response, the storage account is created and ready for use. Now, we can go and define the backend configuration file in Terraform.
Creating a backend configuration in Terraform
Before we create the backend, we will need the STORAGE_ACCOUNT_NAME value. To get this, run the following command:
$ echo $STORAGE_ACCOUNT_NAME
tfstate28099
To create the backend configuration in Terraform, create a file called backend.tf within the workspace:
terraform {
backend “azurerm” {
resource_group_name
storage_account_name
container_name
key
= “tfstate”
= “tfstate28099”
= “tfstate”
= “example.tfstate”
}
}
In the backend configuration, we’ve defined the resource_group_name backend where the Blob Storage instance exists – storage_account_name, container_name, and key. The key attribute specifies the filename that we will use to define the state of this configuration. There might be multiple projects that you are managing using Terraform, and all of them will need separate state files. Therefore, the key attribute defines the state file’s name that we will use for our project. That allows multiple Terraform projects to use the same Azure Blob Storage to store the state.
Tip
Always use the name of the project as the name of the key. For example, if your project name is foo, name the key foo.tfstate. That will prevent potential conflicts with others and also allow you to locate your state file quickly.
To initialize the Terraform workspace with the new backend configuration, run the following command:
$ terraform init
Initializing the backend…
Backend configuration changed!
Terraform has detected that the configuration specified for the backend has changed.
Terraform will now check for existing state in the backends.
Successfully configured the backend azurerm! Terraform will automatically use this backend unless the backend configuration changes.
When we initialize that, Terraform detects that the backend has changed and checks whether anything is available in the existing backend. If it finds something, it asks whether we want to migrate the current state to the new backend. If it does not, it automatically switches to the new backend, as we see here.
Now, let’s go ahead and use the terraform plan command to run a plan:
$ terraform plan
Acquiring state lock. This may take a few moments…
Terraform will perform the following actions:
azurerm_resource_group.rg will be created + resource “azurerm_resource_group” “rg” {
…
}
Plan: 1 to add, 0 to change, 0 to destroy.
So, as we see, terraform plan tells us that it will create a new resource group called terraform-exercise. Let’s apply the configuration, and this time with an auto-approve flag so that the plan does not run again, and Terraform immediately applies the changes using the following command:
$ terraform apply -auto-approve
Acquiring state lock. This may take a few moments…
azurerm_resource_group.rg: Creating…
azurerm_resource_group.rg: Creation complete after 2s [id=/subscriptions/id/
resourceGroups/terraform-exercise]
Releasing state lock. This may take a few moments…
We now have the resource created successfully.
Now, let’s go to Azure Blob Storage and see whether we have a tfstate file there, as shown in the following screenshot:
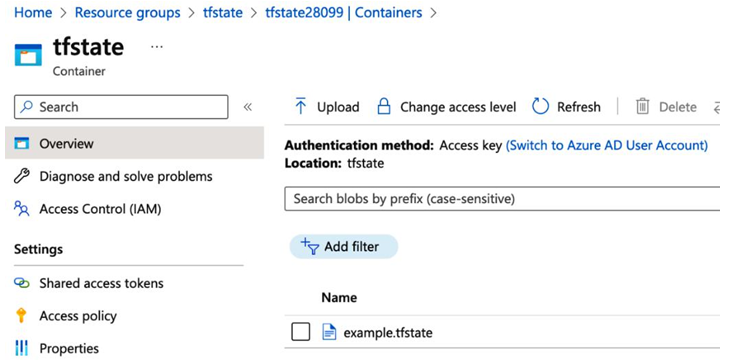
Figure 8.2 – Terraform state
As we see, we have a file called example.tfstate within the blob container. That is how remote storage works, and now anyone with access to the Blob Storage instance can use the Terraform configuration and make changes.
So far, we’ve been managing resources using the default workspace, but what if there are multiple environments that you need to control using the same configuration? Well, Terraform offers workspaces for those scenarios.
Leave a Reply